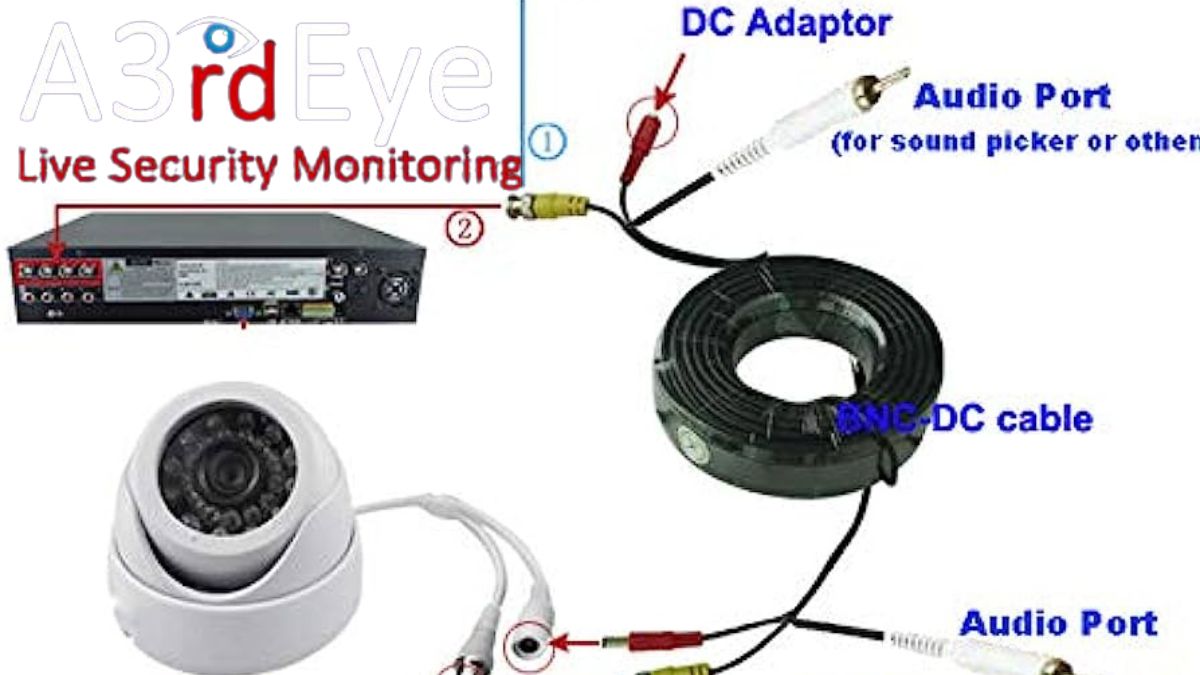
Homemade Security Camera Wire Color Diagram:
Homemade Security Camera Wire Color Diagram: A Comprehensive Guide
Homemade Security Camera Wire Color Diagram: Knowing the wire color diagram is crucial when installing a home security camera system. If your security cameras are not properly wired, they won’t be able to provide the level of monitoring and protection you need for your property. In this post, we’ll provide you all the information you need to know about the different wire colors and their significance in home security cameras.
Understanding Security Camera Wiring
Importance of Proper Wiring
A well-wired security camera system is essential for its proper operation. It assures that the camera and the recording device can exchange power, video, audio, and data signals. With proper wiring in place, you can rest assured that your surveillance footage will be of the highest quality possible, thus enhancing the safety of your property.
Components of a Security Camera System
Let’s quickly go through the main parts of a security camera system before diving into the wire color diagram. Some of these parts are:
Security Cameras: Cameras for security purposes might record footage of the monitored area.
Power Supply: Electricity is supplied to the cameras from the power supply.
Video Recorder: A video recorder captures and archives video.
Cables and Connectors: Power and data are transmitted from one part to another via cables and connectors.
Let’s look into the wire color coding utilized in security camera systems now that we know the basics.
Wire Color Coding
Wires for security cameras are color-coded by purpose to facilitate effortless setup and connection. These are the most frequently employed wire color codes:
Power Wires
The cameras rely on the electricity supplied by the power cables. The following are the conventional colors for electrical wiring:
The red wire represents a positive (+) connection.
To clarify, the black wire is the negative (+) connection.
Video Transmission Wires
The following are the conventional video cable colors:
Video signal, yellow light
White: Common video ground or composite signal.
Cables for Sending Sound
Audio Transmission Wires
The following are the standard audio cable colors:
White or Blue: Audio signal
Black or Brown: Audio ground
Data Transmission Wires
The following are the standard data signal cable colors used by modern security camera systems:
Green: Data signal
Orange: Data ground
These are the most often used wire color codes; however, variances may occur depending on the camera brand or model. For precise wire color information, the camera’s manual or documentation must be consulted.
Wiring a Homemade Security Camera System
Let’s wire a home security camera system in stages now that we know the wire colors to use.
1. Gather the Necessary Tools and Materials
Make sure you have the following ready before beginning the wiring process:
CCTV Systems
Power generation
Recorder, Video
Properly colored wired cables
Tools for cutting and stripping wire
Connectors (BNC, RCA, or Ethernet) Screwdrivers or pliers
Identify the Different Wires
Check the security cameras’ wiring and connections thoroughly. Use the labels and color codes to determine which wires provide power, video, audio, and data.
Connecting Power Wires
Put the camera’s positive (+) and negative (-) power cables into their respective slots on the adapter. Use connectors or tightly join the stripped ends of the wires to provide a safe connection.
Connecting Video Transmission Wires
Connect the camera’s video signal cable (often yellow) to the video recorder’s video input jack. Connect the composite video input or ground wire (often white) to the video source.
Connecting Audio Transmission Wires
Connect the white or blue audio signal cable to the audio input port on the video recorder if your camera has such a feature. Join the black or brown audio ground wire to the ground terminal.
Connecting Data Transmission Wires
Connect the green data signal cable to the corresponding port on the video recorder for a camera with data transmission capability. Join the orange wire (data ground) to the grounding point.
Testing and Troubleshooting
It is essential to test the connections and troubleshoot any problems when the wiring process is complete. Here are the measures to take:
Make sure the cameras are getting enough juice by checking the power source.
Check the quality of the video feed by watching the recorded or displayed material.
Listen for any recorded sound to ensure a strong audio signal.
Verify that all linked devices are able to successfully share information with one another.
During the testing phase, if you run into any issues, please check the camera’s handbook or contact technical support.
Conclusion
A home surveillance system will not function properly without proper wiring. The correct transmission of electrical current, video, audio, and data signals depends on knowing the wire color diagram and making the appropriate connections. If you need help determining the correct wire colors for your camera, be sure to check the manual. Improving the protection of your property is as simple as installing a high-quality security camera system.
For my do-it-yourself surveillance camera setup, can I use any kind of wire?
To prevent signal degradation and interference, it’s best to utilize cables developed for surveillance cameras.
What if there’s a discrepancy between the wire colors and the norm?
Wire colors should be determined according to the camera’s documentation. Each wire has a specific purpose, and it’s crucial that they all work together.
How do I lengthen the wiring?
In order to enhance the wire distance without considerable signal loss, signal amplifiers or extenders can be used. The greatest answers can be found through consultation with experts.
Is it necessary to take any special care when wiring a security system?

Homemade Security Camera Wire Color Diagram

